
- Features
- Searchable Fields
- Libraries
- Facet Features
- Types of Facets
- Configure Facets
- Field Mapping
- Field Properties
- Configure Site
- Profile
- Team Management
- Sites
- Global Coverage
- Disaster Recovery
- Features
- Template Selection
- Keyword Suggestions
- In-Field Suggestions
- Top Search Queries
- Popular Products
- Trending Queries
- Promoted/Blacklisted Suggestions
- Real-time Preview
- Instantaneous Publishing
- Ranking Insights
- Clickstream Data
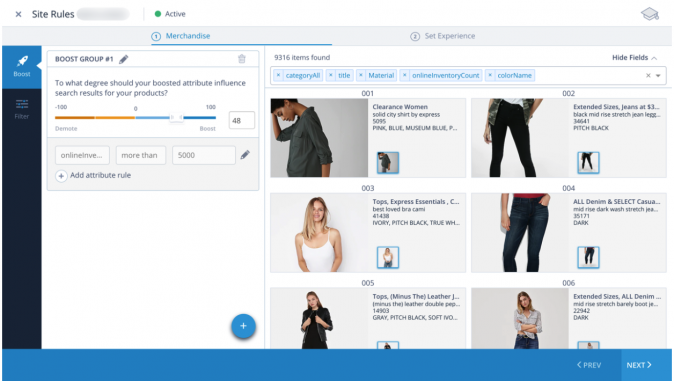
- Boost/Bury
- Sort
- Slot
- Pin
- Filter
- Landing Pages
- Redirects
- Set Banners
- Ranking Insights
- Create a Site Rule
- Managing Field Rules
- Managing Query Rules
- Campaign
- A top-down approach
- Faster and simpler
- Relevant Metrics for better analysis
- Interactive and easy-to-view preview
- Feature-filled Listing Page
- Promotions
- Banners
- Facets
- Redirects
- Add New Promotions
- Boost/Bury
- Sort
- Slot
- Pin
- Filter
- Landing Pages
- All Queries
- Query-based Banner
- Field-based Banner
- Creating Field-based Facets
- Create a Site Rule
- Overall Performance
- Query Report
- Zero Result Queries
- Product Reports
- In-field Suggestions
- Keyword Suggestions
- Top Search Queries
- Popular Products
Site-rules, as the name suggests, are the rules that are applied to all search queries received on your website. Site rule can be used to promote products of a specific brand or filter out-of-stock products from all search queries.
Site Rules allow you to promote or demote a product across all the pages on your site. Similarly, you can use a Site Rule to filter search results to not display products that are out of stock.
- Did this answer your question?
