• Browse
    • Search
    • Recs
Menu
  • Browse
    • Search
    • Recs
Generic selectors
Exact matches only
Search in title
Search in content
Search in posts
Search in pages
  • Browse
    • Search
    • Recs
Menu
  • Browse
    • Search
    • Recs
  • Recs
    • Browse
    • Search
Menu
  • Recs
    • Browse
    • Search
Generic selectors
Exact matches only
Search in title
Search in content
Search in posts
Search in pages
  • Get Started
  • Documentation
  • Integration Docs
  • FAQ
Menu
  • Get Started
  • Documentation
  • Integration Docs
  • FAQ

Down Arrow up_Arrow_active Recommendations

Recs Features

  • Features
  • Advantages

Dimensional Mapping

  • Mapping the fields

Down Arrow up_Arrow_active Algorithms

Core Algorithms

  • Recommended For You
  • Top Sellers
  • Category Top Sellers
  • Brand Top Sellers
  • Bought also Bought
  • Viewed also Viewed
  • More Like This
  • Recently Viewed
  • Complete the Look
  • Cross-Sell

Custom Algorithm

  • About Custom Algorithms

Down Arrow up_Arrow_active Merchandising

Hybrid Algorithms

  • About Hybrid Algorithms

Filters

  • Managing Filter Rules

Fallback

  • Managing Fallback

Down Arrow up_Arrow_active Experience

Campaign Management

  • Campaign Creation

Down Arrow up_Arrow_active User Management

User Management

  • User Profile
  • Manage Site
  • Manage Organization

Down Arrow up_Arrow_active Reports

Reports

  • Overall Performance
  • Site Reports
  • Page-Type Reports
  • Widget Reports

Campaign Management

Once you’ve customized your algorithms, you can create an experience that is timely, personalized, and meets your shopper’s intent. As a merchandiser, an Experience helps you create and reuse custom algorithms to increment conversion by increasing cross-selling and bundling similar products. 


As a shopper, an Experience helps them discover products that meet their needs while fostering brand loyalty.

Campaign Creation

As a content-driven system, analytics is at the heart of Experience and helps us with valuable shopper insights.  


Our intelligent Experience allows you to ‘know your shopper’s need’ better than your competitor without overloading your shopper with information. What sets us apart is our ability to help you understand your shopper’s preferences, predict their favorites, and ultimately provide recommendations that may match the shopper’s intent.


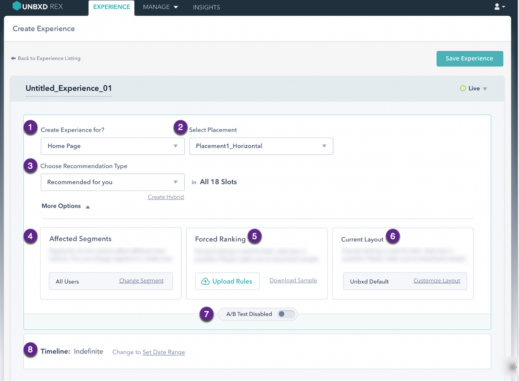
Basic components of an Experience

#

UI Component

Description

1

Create Experience for

Allows you to select the page you want the experience created for.
Options available are:

  • Home Page
  • Category Page
  • Product Display Page
  • Cart Page
  • Brand Page

2

Select Widget

Allows you to indicate the positioning of the widget on a page. There are 4 options available: 

  • No Widget (When this is chosen, the experience will be saved as a draft in the Experience list) This is the default option.
  • Widget 1 
  • Widget 2 
  • Widget 3 

3

Status

Displays the status of the experience based on the widget chosen. 

The options available are:

  • Live
  • Upcoming
  • Expired
  • Draft

4

Choose Algorithm Type

Allows you to select the algorithm you want to use for the experience. 

The options available are:

  • Recommended For You 
  • Top Sellers
  • Bought Also Bought
  • Viewed Also Viewed
  • More Like This
  • Recently Viewed
  • Complete The Look
  • Cross-Sell
  • Category Top Sellers
  • Brand Top Sellers

To create a hybrid algorithm, click Create Hybrid.

5

Affected Segments

Allows you to target specific demography of shoppers. 

Note: This functionality will be available in a future release.

6

Forced Ranking

Allows you to pin specified products for increased visibility. You can also upload Forced Ranking rules. 

Note: This functionality will be available in a future release.

7

Current Layout

Allows you to select and customize a widget template. 

Note: This functionality will be available in a future release.

8

A/B Test

Allows you to test and compare two versions of recommendations. If A/B testing is enabled, you can compare the results from the Unbxd recommendations to a third party recommendations engine to determine which performs better.

Note: This functionality will be available in a future release.

9

Timeline

Allows you to indicate the duration of the experience. To edit, click Set Date Range. The default duration is ‘Indefinite’. 

This topic is intended to familiarize you with Experiences and help you create, modify, and delete Experiences for your site

Create

An Experience combines the personalization and usefulness of custom algorithms within a page to think and learn like a human to recommend intelligent product choices to your shopper.


To create an Experience:

  1. Click Experience > Create Experience. The Create Experience page appears.
  2. Type in a name for the experience in the title text field.
  3. To specify the destination page, click the Create Experience for drop-down list box and select the required page. 
  4. To select the core algorithm, click the Choose Recommendation Type drop-down list box and select the required algorithm. To create an experience based on a Hybrid algorithm, click Create Hybrid. For more information on how to create a Hybrid algorithm within Experience, click here.
  5. To specify the position of the widget, click the Select Placement drop-down list box and select the required option. 
  6. To set up advanced options for segments, ranking, and layout, click More Options.
    Note: This functionality will be available in a future release.
  7. To set a duration for the experience, click Set Date Range.
  8. To save, click Save Experience.


You have successfully created an experience.

Edit

Unbxd allows you to edit and modify an existing Experience.
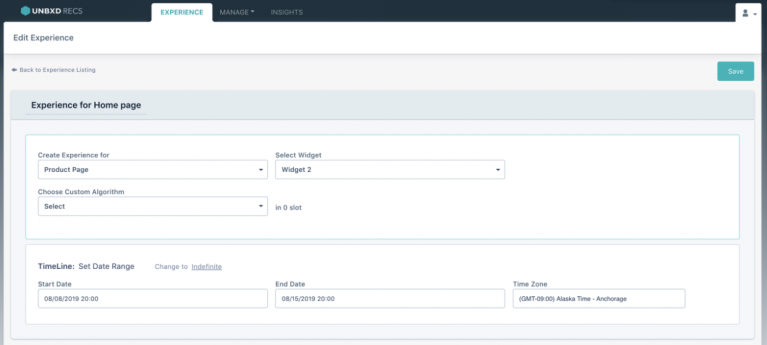


To edit:

  1. Click Experience. The Manage Experience page appears.
  2. Click the drop-down arrow for the required experience within the Manage Experiences table.
  3. Click Edit. The Edit Experience page appears.
  4. To edit the title of the experience, type in a name in the title text field.
  5. To edit the destination page, click the Create Experience for drop-down list box and select the required page. 
  6. To edit the core algorithm, click the Choose Recommendation Type drop-down list box and select the required algorithm. To create an experience based on a Hybrid algorithm, click Create Hybrid. For more information on how to create a Hybrid algorithm within Experience, click here.
  7. To edit the position of the widget, click the Select Placement drop-down list box and select the required option. 
  8. To set up advanced options for segments, ranking, and layout, click More Options.
    Note: This functionality will be available in a future release.
  9. To set a duration for the experience, click Set Date Range.
  10. To save, click Save Experience.


You have successfully edited an experience.

Delete

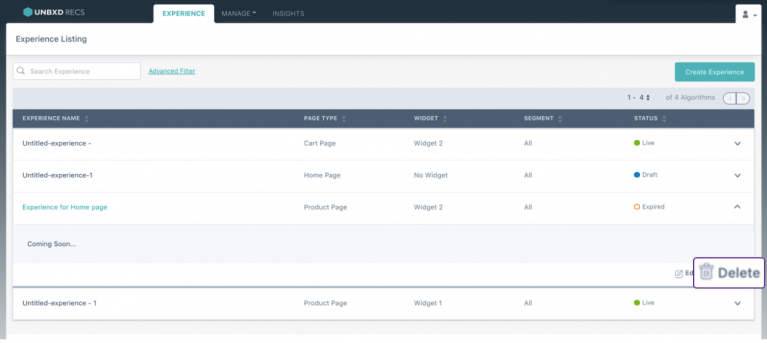
You can delete experiences.


ALERT: Experience once deleted cannot be retrieved.

To delete:

  1. Click Experience. The Manage Experience page appears.
  2. Click the drop-down arrow for the required experience within the Manage Experience table.
  3. Click Delete.
  4. Click Yes, Delete.

You have successfully deleted your Experience.

Duplicate

You can duplicate Experiences when you want to recreate the performance of an existing Experience:

To duplicate:


  1. Click Experience. The Manage Experience page appears.
  2. Click the drop-down arrow for the required experience within the Manage Experience table.
  3. Click Duplicate. The Edit Experience page appears.
  4. To edit the title of the experience, type in a name in the title text field.
  5. To edit the destination page, click the Create Experience for drop-down list box and select the required page. 
  6. To edit the core algorithm, click the Choose Recommendation Type drop-down list box and select the required algorithm. To create an experience based on a Hybrid algorithm, click Create Hybrid. For more information on how to create a Hybrid algorithm within Experience, click here.
  7. To edit the position of the widget, click the Select Placement drop-down list box and select the required option. 
  8. To set up advanced options for segments, ranking, and layout, click More Options.
    Note: This functionality will be available in a future release.
  9. To edit the duration for the experience, click Set Date Range.
  10. To save, click Save Experience.


You have successfully duplicated an experience.

  • Did this answer your question?
  • Yes!

    Nice work, I love it.

    No…

    I have some feedback

On this Section

  • Automatic Synchronization
  • Manual Synchronization
  • Command Line Interface
  • Manual Upgrade
  • Upgrade via Composer

Copyright 2020 © Unbxd Inc, All Rights Reserved. Privacy Policy