- Features
- Create a segment
- Facet Features
- Types of Facets
- Configure Facets
- Field Mapping
- Field Properties
- Real-time Preview
- Instantaneous Publishing
- Ranking Insights
- Clickstream Data
- Boost/Bury
- Sort
- Slot
- Pin
- Filter
- Landing Pages
- Set Banners
- Create a Site Rule
- Managing Field Rules
- Managing Page Rules
- Campaign
- Overall Performance
- Page-Level Reporting
- Zero Result Categories
- Product Reports
Page Rule
Page Rule allows you to manually customize the product order for a particular page. Merchandisers can use page rules to apply their business logic or run promotional campaigns on top of Unbxd AI. For example, run a clearance campaign for the Shoes category, boost Nike products that are on promotion at the top.
Managing Page rules
You can use the Page Rule tab to manage your campaigns. You can do the following:
Create a Page Rule
To create a Page Rule:
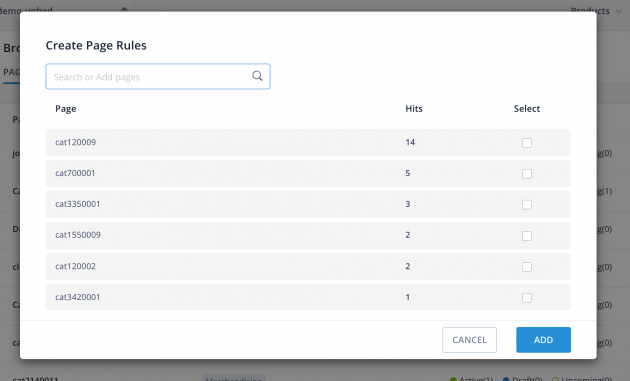
- Navigate to Merchandising → Browse → Page Rule.
- Click .
-
Select the category path(s) for which you want to create a rule.
-
Click ADD.
The category path appears. -
Click the category path to create a campaign.
You’ve successfully added a Page Rule. The next step is to create a Campaign based on this page rule. Once you’ve set your campaign parameters, you can choose from either of the following options:
- Merchandise
- Create a Landing Page
NOTE: Users must check the API call format to select the correct page names.
See how you can create campaigns using merchandising options within the section titled Campaigns.
Delete a Page Rule
You can delete existing campaign or delete keywords while retaining the campaign.
To delete only the keyword:
- Click the page rule.
- Click the edit icon.
- Delete the keywords from the Page rule window.
To delete the page rule, click the delete icon.
CAUTION: Deleting will permanently remove the Rule. You cannot recover a deleted page rule.
Campaigns
Campaigns are created when as a merchandiser you want certain products from your catalog to be promoted to garner more visibility and revenue. Campaigns allow you to easily create a landing page, or redirect to a brand/category page when shoppers search for a specific product/brand/category.
A single page rule can have multiple non-overlapping active campaigns based on device type. Our systems prevent the creation of two overlapping campaigns. Campaigns can have various states depending on their creation. Once they are created they can either be in draft format, published, active, expired, upcoming, or stopped state.
NOTE: You can restart a campaign that has been stopped. To do this, duplicate the 'stopped' campaign and then restart it.
Campaign States
Campaign State defines the current You can set up the rule so that you can either boost, sort, slot, pin, or filter shoes that you want the shopper to see within the Product Listing Page. When you create a campaign, you need to specify the date range of the campaign. The start date launches the campaign and the end date stops it. Even if you are pre-prepared for an upcoming sale, create a campaign and set it for future dates. You can also save your campaign without publishing your campaign (Draft state).
Depending on the start and end dates you select, the state of your campaign can be:
- Draft: When the campaign hasn’t been published yet. Default status when creating a new campaign
- Upcoming: When the campaign’s start date is in the future. You can schedule campaigns that start at a specific time in future
- Active: When the campaign has started and has not reached its end date.
- Expired: When the campaign has passed its end date
- Stopped : When an active campaign has been manually stopped prior to expiry date.
Create Campaigns
Campaigns are created from scratch based on page rules. When you create a campaign, you can apply multiple merchandising options to it as well.
To create a Campaign:
- Create a Page Rule.
- Click .
The Campaign Details section appears. -
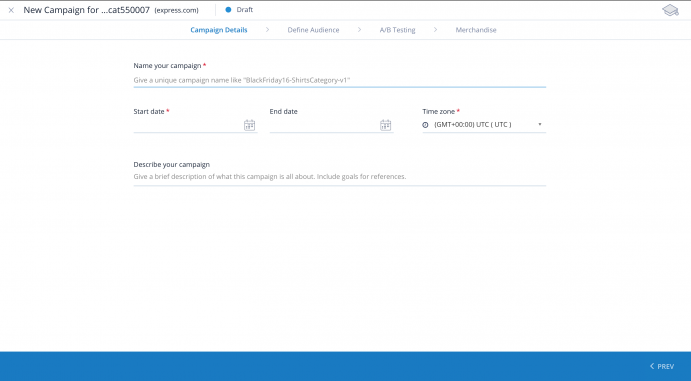
Type the name of your campaign.
-
Enter the start date and end date to specify the duration of the campaign on your site. The end date is optional.
-
Select the time zone for the campaign.
-
Type a brief description of your campaign.
-
Click NEXT.
The Define Audience section appears. -
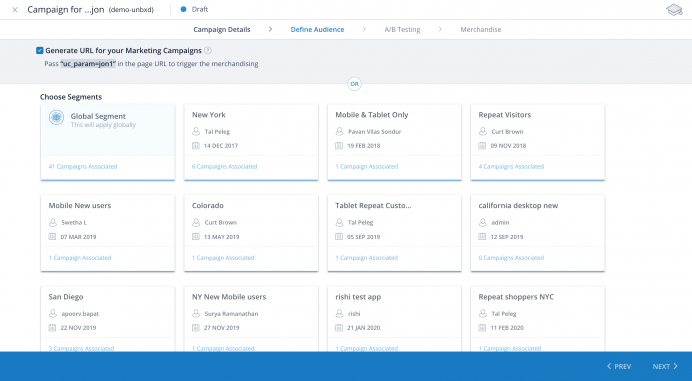
If you want to generate an URL for your marketing campaigns, select the Generate URL for your Marketing Campaigns checkbox.
A parameter appears. You need to pass this parameter in the page’s URL to trigger the campaign. For example, you can add this parameter in the page URL for which you can send in your email campaigns to your customers. When any shopper lands on the page through that email, he/she would see the products corresponding to the campaign. -
Click the circle to select a segment for which you want to run your campaign. A segment can consist of specified locations, devices, and users. For more information on creating segments, see Segments.
-
To apply globally, click the circle to select Global Segment.
-
To view details of a segment, hover on the segment, and then click View Details.
-
To duplicate a segment, click , and then click Duplicate.
-
To delete a segment, click , and then click Delete.
-
Click NEXT.
The A/B Testing section appears. -
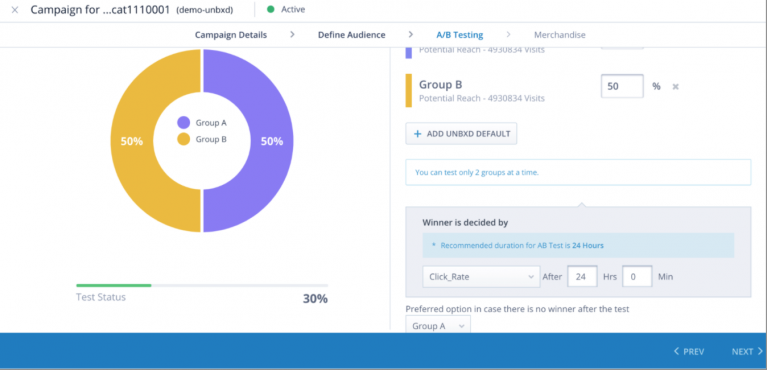
If you want to perform A/B testing on the products for the page, do the following:
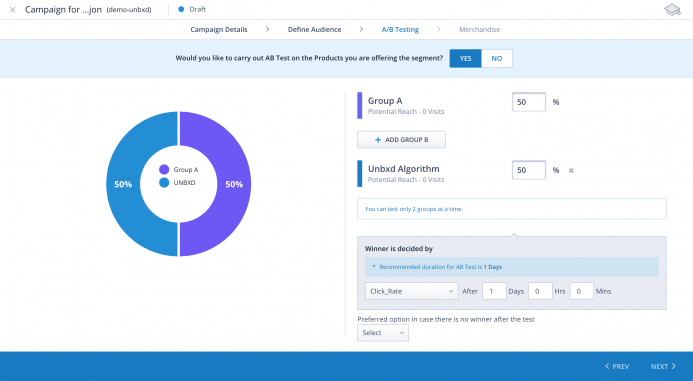
a. Click YES.
b. For Group A, enter the percentage of total visitors that you want, should see this group.
c. Do one of the following:
- If you want Group B as your merchandising comparison with Group A, click ADD GROUP B, and then enter the percentage of total visitors that you want, should see this group.
- If you want Unbxd Algorithm as your merchandising comparison with Group A, click ADD UNBXD DEFAULT, and then enter the percentage of total visitors that you want, should see this group.
Note: You can only test two groups at a time.
d. Do one of the following:
- If you want to set the winner by click rate, select
Click_Rate
, and then type the duration for your A/B test. - If you want to set the winner by average order value, click
Average_Order_Value
, and then type the duration for your A/B test.
Note: The recommended duration for A/B test is 24 hours.
e. Select the preferred option ( for example, between Group A and Group B, you can select Group A or Group B) in case there is no winner after the A/B test.
f. Click NEXT.
g. If you have chosen Group A and Group B to test your merchandising options for your campaign, set the merchandising option and experience configuration for both the groups separately.
Note: For setting the experience for both groups, see step j and k.
h. To set up banner using an image URL, do the following:
- Click Image URL.
- Enter the URL of an existing banner image.
- Enter the corresponding landing page URL.
i. To set up a banner using HTML, click HTML, and then paste your banner HTML code.
You can also view the status of the A/B testing.
- Click NEXT.
The Merchandise section appears.
Edit Campaigns
Edit allows you to modify certain fields or attributes of an existing Campaign. This is especially helpful if you want to fine-tune an existing campaign to based on clickstream data or a change in business goals.
To edit an existing campaign:
- Within the console, navigate to Merchandising > Browse.
- Click the Page Rule tab.
- Click the required campaign within the Page Rule table.
- Click the Edit icon. The Enter Campaign Details window appears.
- To change the name of the campaign, provide a name in the Name your Campaign text field. This is a required field.
- To edit the start date, click the Start Date calendar icon. This is a required field.
To edit the end date, click the End Date calendar icon. If you don’t select an end date, the campaign will run for perpetuity. - To edit the timezone, click the Time zone drop down list and select the required time zone. This is a required field.
- To change the target device or Operating System, click the devices listed within Target users based on device type. Options available are: Desktop Browser, Tablet Browser, Mobile Browser, Android App, iOS App, Windows App
- To edit the description, type in the Describe your campaign text field.
- Click Next to proceed. The Configure Campaign window appears.
- To merchandise, click Continue Merchandising. To add a custom landing page, click Create Landing Page. Refer to Landing pages for more information. To add an existing page, click Add URL. Refer to Landing page for more information.
- To edit the rules for merchandising features like Boost, Sort, Slot, Pin, or, Filter, select the respective tab.
- Click Next and select Banner tab.
- Type in the Image URL and the Landing Page URL. Alternatively, you can also paste the HTML code of the landing page.
- Click Publish.
You have successfully edited the campaign.
Preview Campaigns
Preview allows you to view the campaign details, merchandising options (boost, sort, slot, pin and filter rules), and banner details.
To preview an existing campaign:
- Within the console, navigate to Merchandising > Browse.
- Click the Page Rule tab.
- Click the required campaign within the Page Rule table.
- Click the preview icon. The Enter Campaign Details window appears.
- Click Next. View merchandising options and Banner options.
- Click Close.
Duplicate Campaigns
Duplicate allows you to make multiple copies of an existing campaign. Duplicating a campaign allows you to view and modify certain fields or merchandising options while retaining other fields to save time and effort.
To duplicate an existing campaign:
- Within the console, navigate toMerchandising > Browse.
- Click the Page Rule tab.
- Click the required campaign within the Page Rule table.
- Click the doner icon and click Duplicate.
- To change the name of the campaign, provide a name in the Name your Campaign text field. This is a required field.
- To edit the campaign, click Next. To know how you can edit a campaign, refer to Edit Campaigns.
You have successfully duplicated and edited a campaign.
Delete Campaigns
To delete an existing campaign:
- Within the console, navigate to Merchandising > Browse.
- Click the Page Rule tab.
- Click the required page rule within the Page Rule table.
- Click the doner icon for the required campaign and click Delete.
- Click Yes, Delete.
You have successfully deleted a campaign.
Caution: Deletion is permanent. You cannot recover a deleted Campaign.
- Did this answer your question?
On this Section
- To create a Query Rule
- To Edit a Query Rule
- Delete a Query Rule
- Campaign States
- Create Campaigns
- Edit Campaigns
- Preview Campaigns
- Duplicate Campaigns
- Delete Campaigns